The Palm III cradle surgery page!
Here's what I did to enable my old Newton keyboard to work with my Palm III!
Note: I'm still working on the schematic illustration for this, so the instructions aren't exactly complete. Please stand by... (:
The goal: Install a jack for the Newton keyboard right on the back of the PIII's cradle, and use that single jack for both the Newton keyboard and also everyday HotSyncs with the desktop machine. This modified cradle no longer has a wire sticking out the back at all, just an imbedded jack. Generally you can then leave it connected to the computer via a boring old serial cable plugged into the back of the cradle (PC users will also need an adaptor; see below) then when you want to go on the road, just unplug the cradle from the serial cable, grab your keyboard (and Palm guy) and off you go.
Note: differences for PC users and Mac users:
My main focus was on making the cradle a portable, self-contained unit to take on the road, and to plug the keyboard into. That means that the jack that I installed in the cradle is a mini-DIN, Macintosh-style jack, because that's what the Newton keyboard needs. It'd be just as easy to install a PC-style jack, but then you'd need an adaptor to work with the keyboard, and who wants to carry an adaptor around with them all the time? If you're a PC user and make the modifications as shown here, you can use the keyboard directly with the cradle, and then when you HotSync just keep an adaptor hooked up to a regular cable leading to your COM port. Macintosh users can just use any old generic serial cable (Mac printer/modem cable) to hook the cradle directly to either the Printer or Modem port with no adaptors or anything. A compromise option would be to install both types of jacks into the cradle, and just plug in either the serial cable to the PC or the keyboard, depending on whether you're at home or at McDonalds (a true computing environment).
Broadly speaking, here's what I did. If you do this, anything you screw up is your own fault, not mine, bla bla bla. And once you start messing with your cradle like this, I don't think 3Com's going to listen to any pleas of "But it's under warantee!" And remember to back up your data before starting, because if you mess up, well, uh, you just broke your cradle, so you ain't gonna be able to HotSync again until you fix or replace it! Better yet, buy a spare cradle first!
Here's what you need:
- A Palm III (or IIIx, or IBM WorkPad) and its cradle. The cradle for the Pilot, PalmPilot Personal and Professional is a different design, and I don't know much about that.
- A keyboard driver (FreeKey or KeyZ or PiloKey or whatever)
- Jeweler's screwdriver (phillips) to open up the cradle
- Soldering stuff: a soldering iron, a sponge to wipe it on, solder, and all that.
- A mini-DIN jack (female)
- Wire cutters, and various related tools that might be handy (needle-nose pliers and such)
- Something you can use for making a hole in the cradle big enough to plug the Newton keyboard in. (i.e. an awl and a little round file, or the mother of all hole-punches, or whatever)
Here's what you do:
- Load your keyboard driver into your PIII (or whatever) now before we start. That way, we can use the keyboard to immediately test the modifications we're about to make to the cradle. It'll also have the automatic effect of making sure you HotSync your data like I suggested above, so all the better.
- Unplug your cradle from the computer. Duh. Go someplace where you have light, and can wield a soldering iron without melting stray objects.
- Open up the cradle:
- Remove the single screw on the bottom, and put it somewhere safe.
- Slide the front face up and back. (Hey! There ain't nuthin in there! What a gyp! :)
- Be careful, because your HotSync button's gonna fall out. Put it somewhere safe along with that screw.
- Then with a bit of gentle fiddling, work the rounded back panel off of the base: it's held on by some plastic tabs on the sides and rear.
- Remove the single screw on the bottom, and put it somewhere safe.
- Take that back panel and drill a hole in the rear of it. I put mine smack dab in the middle, but your sense of aesthetics may vary. Make it big enough for the round part of the Newton keyboard's plug to fit in, and when you place your hole, remember to leave room inside the cradle for the guts of your mini-DIN jack because it's gotta fit in there somewhere. I just poked a hole with an awl, and then used a little round file to widen it to more or less the right size.
- Take the cradle's cable, measure out about 30cm from the cradle, and cut it. Owtch!! Well we're commited now! (: Wind the rest of the cable up, and put it in that box of electronic cables & stuff you keep under the stairs - maybe it'll come in handy someday! (Ha...) We cut it long so that we have some leeway in case we mess up and have to cut the end off and try again. If you have absolute confidence in yourself, feel free to cut it shorter...
- Unscrew the two screws holding the HotSync terminal part to the bottom of the cradle. Put those screws somewhere safe.
- Carefully work the cable out of that little plastic channel that leads it back and out the rear of the cradle. Our cable's not going to go out the rear anymore, so we don't need the channel. (You'll probably put little knicks in the insulation of the cable when you do this...I did! Just try to minimize them, they won't hurt anything. Probably. :)
- Now we want to hack some (or even all) of that channel away so we can bend the cable back around and to the jack we're going to install, rather than out the hole in the back. Take wire cutters or a knife or something and hack away! Try to avoid hacking your fingers off at this point, as it will make the later soldering steps more difficult. You don't have to make it perfectly smooth, just remove enough of it so that we'll have some maneuvering room with our cable later.
- Strip about 2cm of the insulation off of the truncated cable protruding from the cradle. Fold the silver shielding back but don't cut it, we'll need it later. You can get rid of that paper insulation though. You now see 6 happily colored wires. Strip a little bit of the insulation off of each one.
- Get your 9-pin mini-DIN jack ready and heat up your soldering iron, 'cause here we go!
- Solder the correct colored wires to the appropriate terminals on the mini-DIN jack. Then take some of the shielding that we folded back earlier from the wire, and solder it to the shield terminal of the jack.
- Visually check to make sure everything's connected to the right place, and that nobody's shorting out anybody else. Probably not a good idea to short out your expensive hardware, so check it now.
- Reattach the back of the cradle to the base
- Wrap the extra cable inside, aligning the mini-DIN jack with the hole you cut earlier.
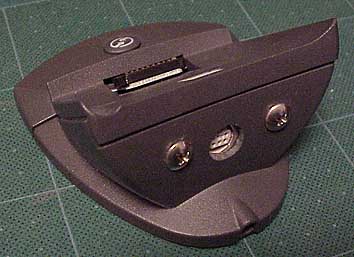
- Mount the mini-DIN to the hole firmly. You're going to be connecting and disconnecting cables here at the jack end, so it's important to find a way to keep the jack from moving around (or breaking off.) I've seen a photo of someone who managed to mount it without anything but the hole showing on the back of the cradle, but I chose the easy way out and just used a piece of plastic to hold the jack in place, with a pair of mega screws poking out the back holding it all together. Could have been cooler, but this way I can always take it apart in case I later change my mind or want to repair it.
- Reassemble the cradle, part I:
- Re-attach the HotSync terminal with those two screws.
- Put the HotSync button back where it goes (with one leg under that loop.)
- Re-attach the HotSync terminal with those two screws.
- At this point you should test your connections to see if anything got worked loose or is being shorting out. This means docking the Palm III with your half-assembled cradle.
- Test 1: Attatch your Newton keyboard to the back of the cradle, put the PIII on the cradle, activate your keyboard driver (some drivers require you to reset your Pilot, some don't), and give it a shot! Wheee!
- Test 2: Attatch a serial cable from your Mac to the back of the cradle, and HotSync! Wheee!
- Test 3: Attach a modem directly to the cradle. Connect to your ISP or somewhere. Wheee!
If it doesn't work:
- Take things apart enough to look for detatched wires, bare wires touching other bare wires, random globs of solder connecting things that probably shouldn't be connected... Then put it together again and check it again...and again...and again.....
When it finally works:
- Reassemble the cradle, part II:
- Slide the front panel back down.
- Then replace the screw in the bottom, and you're done!
- Slide the front panel back down.
Option: If you're a PC user, you can either leave an adaptor attatched to your serial cable for when you connect it to the modified cradle, or you could be really spiffy and install two serial jacks, the one for the keyboard, and another one (a standard PC 9-pin DB9) for HotSyncing! (Getting a bit crowded in there!)
If you were to try to install both, you could probably just connect the lines in series, from one jack to the next, and that should work. I think. I wouldn't think you'd want to actually use both simultaneously, though. Anyway, it's something to think about.
Have fun! (: